Friday, April 29, 2022

Lilo & Stitch Birthday Party

Written by Christine | April 18, 2022


This was the theme for a One year old's birthday party but would work for any age.  The guest of honor loved everything Lilo & Stitch so this party had it all; aliens, surfboards, monstera leaves, an Elvis cake, a killer playlist and even a hula dancer! We found an awesome surf themed taco bar in our neighborhood and created the sweetest party for our Ohana. If you are having a party for the Lilo & Stitch lover in your life check out some of the fun projects that brought this theme to life!


Ohana Photo Board (how-to)
  • Expandable greenery fence, such as this.
  • 50-60 4x4 photos (We edited ours using a cartoon and vintage effect on a photo editing app and then had them printed at target)
  • 25 sheets of white craft paper
  • Paper cutter with ruler
  • glue dots
  • Bag of mini clothes line pins
  • Ohana sign
  1. Select your photos and edit using the cartoon effect (insta toon and many other apps have a cartoon filter). Save your photos and have them for printed 4x4. 
  2. Cut the white crat paper into 5x6 rectangles. 
  3. Attach the photos using glue dots to the white rectangles
  4. Write the people, event, and/place in the pictures (we told people to take whatever pictures they wanted at the end of the party and they were a nice keepsake)
  5. Attach central Ohana sign with clothes pins
  6. Use the clothespins to attach your new polaroids to the greenery fence once its expanded and in the place you plan on displaying it. This would work hanging from fishing wire, or propped up a wall. 


All signs were created using the Cricut Explore 2 and a Lilo and Stitch font found on DaFont.com.


Monday, April 18, 2022

Mickey Beignets

Mickey Beignets

Missing the Mickey Beignets at Scat Cat's Club CafĂ© in the Port Orleans-French Quarter resort? Make these for a taste of Disney Magic at home!

Written by: Christine K April 18, 2022


These beignets are possible to pull off for breakfast because the first rise is overnight! Add some sprinkles and they are perfect for a birthday treat!

What you need:

Special equipment:

Mickey cookie cutter (about 4 inches)
Candy thermometer -for frying
Rolling pin


Ingredients:

1 1/2 cups of confectioners sugar (for dusting)
1/4 cup sprinkles
Neutral cooking oil (such as safflower or canola)-enough to come a few inches in a Dutch oven (oil should not come up past two inches from the top of the pan)

2 TBSP warm water (about 100 degrees)
1 packet active dry yeast (or 2 1/2 tsp)
1/4 cup plus 1/2 tsp sugar (separate)
1/2 cup melted butter
1 cup whole milk 
1 large egg 
1 tsp salt
1/2 tsp baking powder
3 1/2-4 cups flour (plus a couple TBSP for rolling)

  • In a large bowl (or the bowl of a stand mixer) whisk together the water, yeast, and a 1/2 tsp of sugar. Let it rest for 5 minutes, until foamy. If the yeast mixture did not get foamy/frothy, your yeast may be dead and you may want to consider starting over with different yeast. 
  • Microwave the butter and milk (separately) while waiting for the yeast. You want both to be warm for the next step.
  • Add the butter, the warmed milk, 1/4 cup sugar, and egg to the yeast mixture and stir. 
  • Add 2 cups of flour, the salt, and baking powder. Stir with a wooden spoon or beat on low speed, adding more flour (up to 1 1/2 to 2 cups more) until you have a soft, slightly sticky dough. 
  • Scrape down the sides of the bowl, sprinkle with a bit more flour, cover with plastic wrap, and let rest at room temperature for 30 minutes before placing in the refrigerator overnight (up to 12 hours)
  • When you are ready to make, remove the dough from the refrigerator and let it sit at room temperature for 30 minutes.
  • When your dough has about 5 minutes left to rest, heat your oil (remember to leave room at the top and use you candy thermometer attached to your pan to monitor the temperature. (Fry at 375 degrees) ).
  • Punch down the dough and dump it onto a lightly floured work surface. Roll the dough out into a roughly 16 x 12-inch rectangle and cut with your Mickey Cutter. Cover lightly with plastic wrap.
  • Gently lower your beignets into the oil using a slotted spoon or spider. Your batches should be limited to 3-4 as to not overcrowd the pan. Fry for 2-3 minute (1-1.5 minutes per side). 
  • Remove with a spider or slotted spoon to a paper towel lined tray or plate. Sprinkle with powdered sugar immediately and flip to get both sides. *Be careful and use your tools to protect your hands- these are hot! 
  • When all the beignets are done, set out on a clean plate, add more sugar if desired, and a dusting of sprinkles for extra magic!


Sunday, April 17, 2022

Mickey Ear Disney Easter Egg Name Cards


Mickey Ear Easter Egg Name Cards

Written by: Christine | April 17, 2022


These sweet name cards inspired by our favorite mouse cost less than $20 to make even if you are having two dozen guests! All of our supplies were purchased at Michaels and Target. Start to finish, you need 10 minutes! We paired ours with some infusible ink made flour sack napkin, some prop carrots and a simple place setting. Magic made easy; Happy Easter!


What you need:

1. Paper Mache or Foam Eggs (as many as needed for your table)

2. Pom-Poms (2 per egg)-coordinating or contrasting colors look great!

3. A sharpie

4. Hot Glue Gun or Pen (with glue sticks)


Directions:

1. Wipe your eggs clean while your glue gun preheats.

2. Count out the pom-poms you will use for your eggs so you can work fast when the glue is hot!

3. Squeeze one small dot of glue for each pom ear and place poms on. Hold firmly (and carefully for a moment).

4. After the glue is set, write your guests names on the egg.

5.  Place in an egg holder, if desired (these also look cute lying on the plate).


Thursday, April 14, 2022

Funfetti Mickey Waffles

Funfetti Mickey Waffles

Written by: Christina | April 13, 2022


 https://drive.google.com/uc?export=view&id=1-JGKadtyeCIs-sYpCsgTEXN4UWvJlR9b

These fun waffles are a special birthday treat in my house! Funfetti Mickey waffles are not only adorable but they are delicious! My one year old daughter who isn't into syrup quite yet really loves these because they are a bit sweeter than a typical waffle.  I love them because the color is just magical and makes them perfect for a special occasion!


What you need:

Mickey waffle iron (I bought mine at Hot Topic)

2 cups All-Purpose Flour
2 tsp baking powder
1/2 cup sugar
1/2 tsp salt
2 eggs
1 cup milk
1/3 cup vegetable oil
2 tsp vanilla extract
1/2 cup Rainbow Sprinkles


https://drive.google.com/uc?export=view&id=1IwG6tAQnR4huGUvIeZBHp_AV5ml3U1bB


Directions: 

1. Preheat the waffle iron

2. In a large bowl, whisk together the flour, baking powder, sugar, and salt

3. Make a well in the center of the bowl and add the eggs, milk, and oil

4. Stir until the batter is completely mixed then add in the vanilla and sprinkles.

5. Spray both sides of the waffle iron with nonstick cooking spray

6. Spoon in your batter and follow waffle iron directions. 

7. Serve with syrup for breakfast or with ice cream, chocolate syrup, and whipped cream for dessert!


https://drive.google.com/uc?export=view&id=10dGFU6lGSm6ON8sMnAECeWcwnP-VD8_Khttps://drive.google.com/uc?export=view&id=1gdi0def8YdvhDYNqCXZsUQuM1CCBRd-ahttps://drive.google.com/uc?export=view&id=141qOR8ThYsmdMn6IGlp0npuN6Dus2hh4https://drive.google.com/uc?export=view&id=1KKkKWSs0f17unfXvAShtcrIBpfz0-KTC

Wednesday, April 13, 2022

Disney Easter Egg Freebie!

Disney Easter Egg Freebie!

Written by: Christina | April 13, 2022


These are the cutest little Easter egg holders to add some Disney magic to this holiday.  Include Mickey and Minnie at your Easter dinner table! After you have dyed your eggs this is a great way to display them.  You can put them out as decor or you can use them as place cards for your guests! This is a great project to do with your kids, they can use the blank Mickeys and Minnies and use crayons, markers, paint, glitter whatever they'd like to decorate. 

What you need:

1. Our Disney From Jafar Easter Egg Freebie!

2. White cardstock or paper 

3. A printer

4. Scissors

5. Glue or tape

Directions:

1. Print the Disney From Jafar Easter Egg Freebie!

2. Cut out as many of the egg holders as you need

3. Cut our your favorite Mickey or Minnie.  Try the blank ones to decorate however you'd like!

4. Loop the egg holder and glue, staple, or tape it in place where the DFJ logo is found (you can make this as tight or as loose as you need depending on the size of your Easter eggs.

5.  Tape or glue your Mickey or Minnie to the front of the egg holder.  


Tuesday, April 12, 2022

Simple Minnie Cupcakes

Simple Minnie Cupcakes

Written by: Christina | April 12, 2022     


These are the easiest way to add a magical touch to your dessert.  We decided to have a little last minute family get together for my daughter's 1st birthday.  The bakery near by was totally booked and I was at a loss for how to make her day special.  My mom actually came up with the plan to create our own Minnie Mouse cupcakes.  As non professional cake decorators it had to be something easy.  I think these cupcakes turned out absolutely adorable! These would be a great addition to a Minnie or Mickey dessert table. 

What you need:

1. Make your favorite cupcakes

2. Frosting

3. Food coloring

4.  Mini oreos

5. Piping bag

6. Sprinkles


Instructions:

1. Bake cupcakes 

2. Use food coloring to make your frosting whatever color you'd like

3. Put frosting into a piping bag and frost your cupcakes

4. Separate the mini Oreos and scrape out the filling.  I used a small paring knife for this

5.  Stick two Oreos into each cupcake

6. Add sprinkles if you'd like
https://drive.google.com/uc?export=view&id=18AVnyDVtaSkLNiO44hh7HYdi1MLaD7Dvhttps://drive.google.com/uc?export=view&id=1oibeTjqRH-LUirnFcBFrLkhaHNbLGSHG

So simple, yet so cute!


https://drive.google.com/uc?export=view&id=1phdLGz-xuuFCNg7fmy1l4glcrXV8Swt0https://drive.google.com/uc?export=view&id=1ODFWWn9xXNj5TEsOU4TUnlwCw4xhYdFh

Monday, April 11, 2022

Mickey Chocolate Chip Cookies


Mickey Chocolate Chip Cookies

Written by: Christina | April 12, 2022


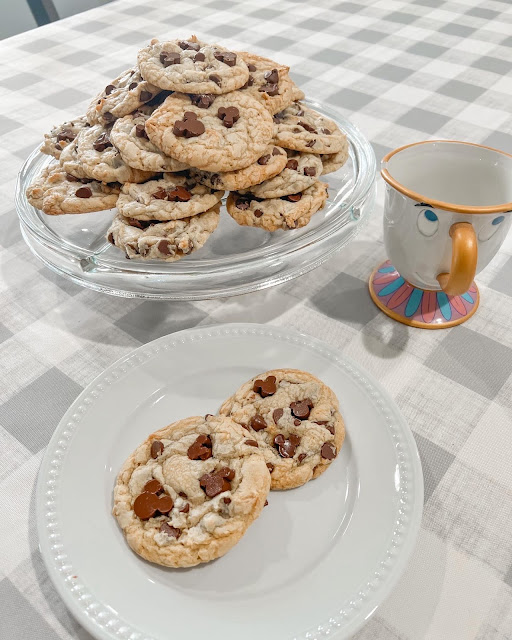
I purchased this Mickey ice tray on Amazon and knew they would make the cutest little chocolate Mickeys. So, that's what I did.  I simply melted some semi-sweet chocolate chips with a makeshift double boiler and filled the ice tray and after an hour or so in the fridge they were perfect!

What you need:

1. Mickey ice tray

2. Chocolate chips or chocolate melting wafers (type of chocolate is your choice, I used semi-sweet)

3. Double boiler or glass bowl and sauce pot

4. Your favorite chocolate chip recipe and necessary ingredients


Instructions:

1. Fill a sauce pan with some water and put it on low heat

2. Place glass bowl on top (bowl should not touch the water)

3. Stir regularly to avoid burning

4. Once it's fully melted pour on to the mold

5. Use a rubber spatula to make sure it fills the mold

6. Refrigerate until chocolate is completely hardened 

7. Pop the chocolates from the mold. 

8. Bake your favorite chocolate chip cookies

9.  After they come out of the oven and cool for a couple of minutes add the desired amount of Mickey chocolates to the top


Enjoy!!! 


Friday, April 1, 2022

Tinkerbell Lantern Decor

Tinkerbell Lantern: Home or Party Decor

Written by: Christina | April 1, 2022


I really love Disney decor that is subtle, something that people can walk by and maybe not even notice is Disney.  I try and add these touches to my home and I had many things like this incorporated into my wedding. 

I made this Tink lantern for my wedding as just a little something on one of the side tables but I think it's cute enough to display in my home especially because I have other lanterns throughout my house. Best part is it was so easy to make!

What you need:

1. A lantern (mine was from Michaels)

2. Fishing line or other clear, thin string

3. A Tink cut out (I used my Cricut but you could print one on cardstock and cut it by hand)

4. Moss (sold at most craft stores)

5. A small push light (I bought mine from Amazon)


Instructions:

1. Cut our your Tink.  There are many different silhouette versions of Tink to choose from.  I used my Cricut to cut it out but there are options if you don't have one.  I would trace Tink on to a piece of black paper using a pencil and cut it out.  Another option is to print a picture of her onto a white piece of cardstock using black ink.

2. Poke a small hole on the top of Tink's head and run a piece of fishing line through it.  The length of your fishing line should be determined on the size of your lantern and exactly where you want her to fall inside of it. 

3. Place the push light in the bottom center of the lantern and surround it as best you can with moss.


4. If there is no where to tie Tink you can always use hot glue to attach it to the top.  


5. That's it!!! Enjoy your new Tinkerbell lantern!


Irish Soda Bread Mickeys

  Mickey Irish Soda Bread Written by: Christine | March 2, 2023 Ingredients: 4 1/2-4 3/4 C. AP flour (plus more for rolling out) 1 tsp. baki...