Monday, August 29, 2022

Enchanted Rose Cakes

Enchanted Rose Cakes

Written by: Christine | August 29, 2022


These magical treats are so simple since they use box mix. We substitute the buttermilk for the water and half the oil for butter. We also through in some white chocolate chips and make super simple cream cheese icing to drizzle. A dusting of sparkly sprinkles and your red velvet rose cakes become enchanted!

Ingredients:

1 C. Buttermilk
3 eggs
1 tsp. vanilla
8 TBSP. melted butter

Spray the pan with baking spray or butter and flour (they don't seem to make this pan anymore but they do still make this Multi-flower version).

Stir the mix, melted butter, buttermilk, eggs and vanilla together. Fill the cakelets (3/4 full). Bake for about 18-22 minutes. Let cool. 

Beat 1/2 a bar of cream cheese until smooth and fluffy. Add 1/2 cup of powdered sugar. Add 2-3 tablespoons of milk until it is the right texture. Loose enough to drizzle. You can fill a piping bag or plastic bag or just use a fork or spoon to drizzle. Sprinkle lots of sparkly red sprinkles. 


Saturday, August 20, 2022

Coco Inspired Mickey Ears


Coco Inspired Mickey Ears

Written by: Christina | August 20, 2022


We are leaving for Disney in 2 days and we will be going to the Mickey's Not So Scary Halloween Party! My sister and I decided we wanted to go with a Coco theme for our outfits.  I had some left over plain Mickey ears from my daughter's birthday party and used them as the base and these were SO easy!
 

What you need:

Hot glue gun


How we did it:

1. I glued the battery pack for the lights in the center of the headband (between the ears). Don't worry, the flowers will cover it, just make sure you can get to the switch to turn lights on and off. 

2. I then glued the lights around the ears, I put a drop of hot glue on each light.  Leave the remaining lights hanging for now.

3. Glue the flowers in place. I put flowers on the front and back.

4. Take the remaining lights and tangle them in the flowers.

And that's it!!!!


Thursday, August 18, 2022

Winnie the Pooh Macarons


Winnie the Pooh Macarons

Written by: Christina | August 18, 2022


How darling are these little Pooh Bear Macarons?! I am obsessed with them!  These would be so cute at a Winnie the Pooh baby shower or 1st birthday party! 


Making macarons can be intimidating but the design on these is relatively simple.  It just requires the extra piping of the ears and an edible marker for his face. You can fill your macarons with whatever you'd like, but to stick with the Winnie the Pooh theme I went with a honey filling. They were as sweet as they look!

Make sure to gather all of your ingredients and measuring tools.  I printed out a macaron stencil I found for free online to place under my parchment paper to try and make my cookies the same size.  Just make sure to remove the paper before you bake.  


It's important that the almond flour mixture is fine and light.  So it first goes into a food processor and then it gets sifted. 


Use either a stand mixer or a hand mixer to beat the egg whites.  This takes some time so be patient!


I was always taught to use a glass when filling piping bags. It helps hold them in place so you can use the rubber scraper to get the batter into the bags neatly.  I used two bags for these, one with a large round tip for the shells and one with a small round tip for the ears. 


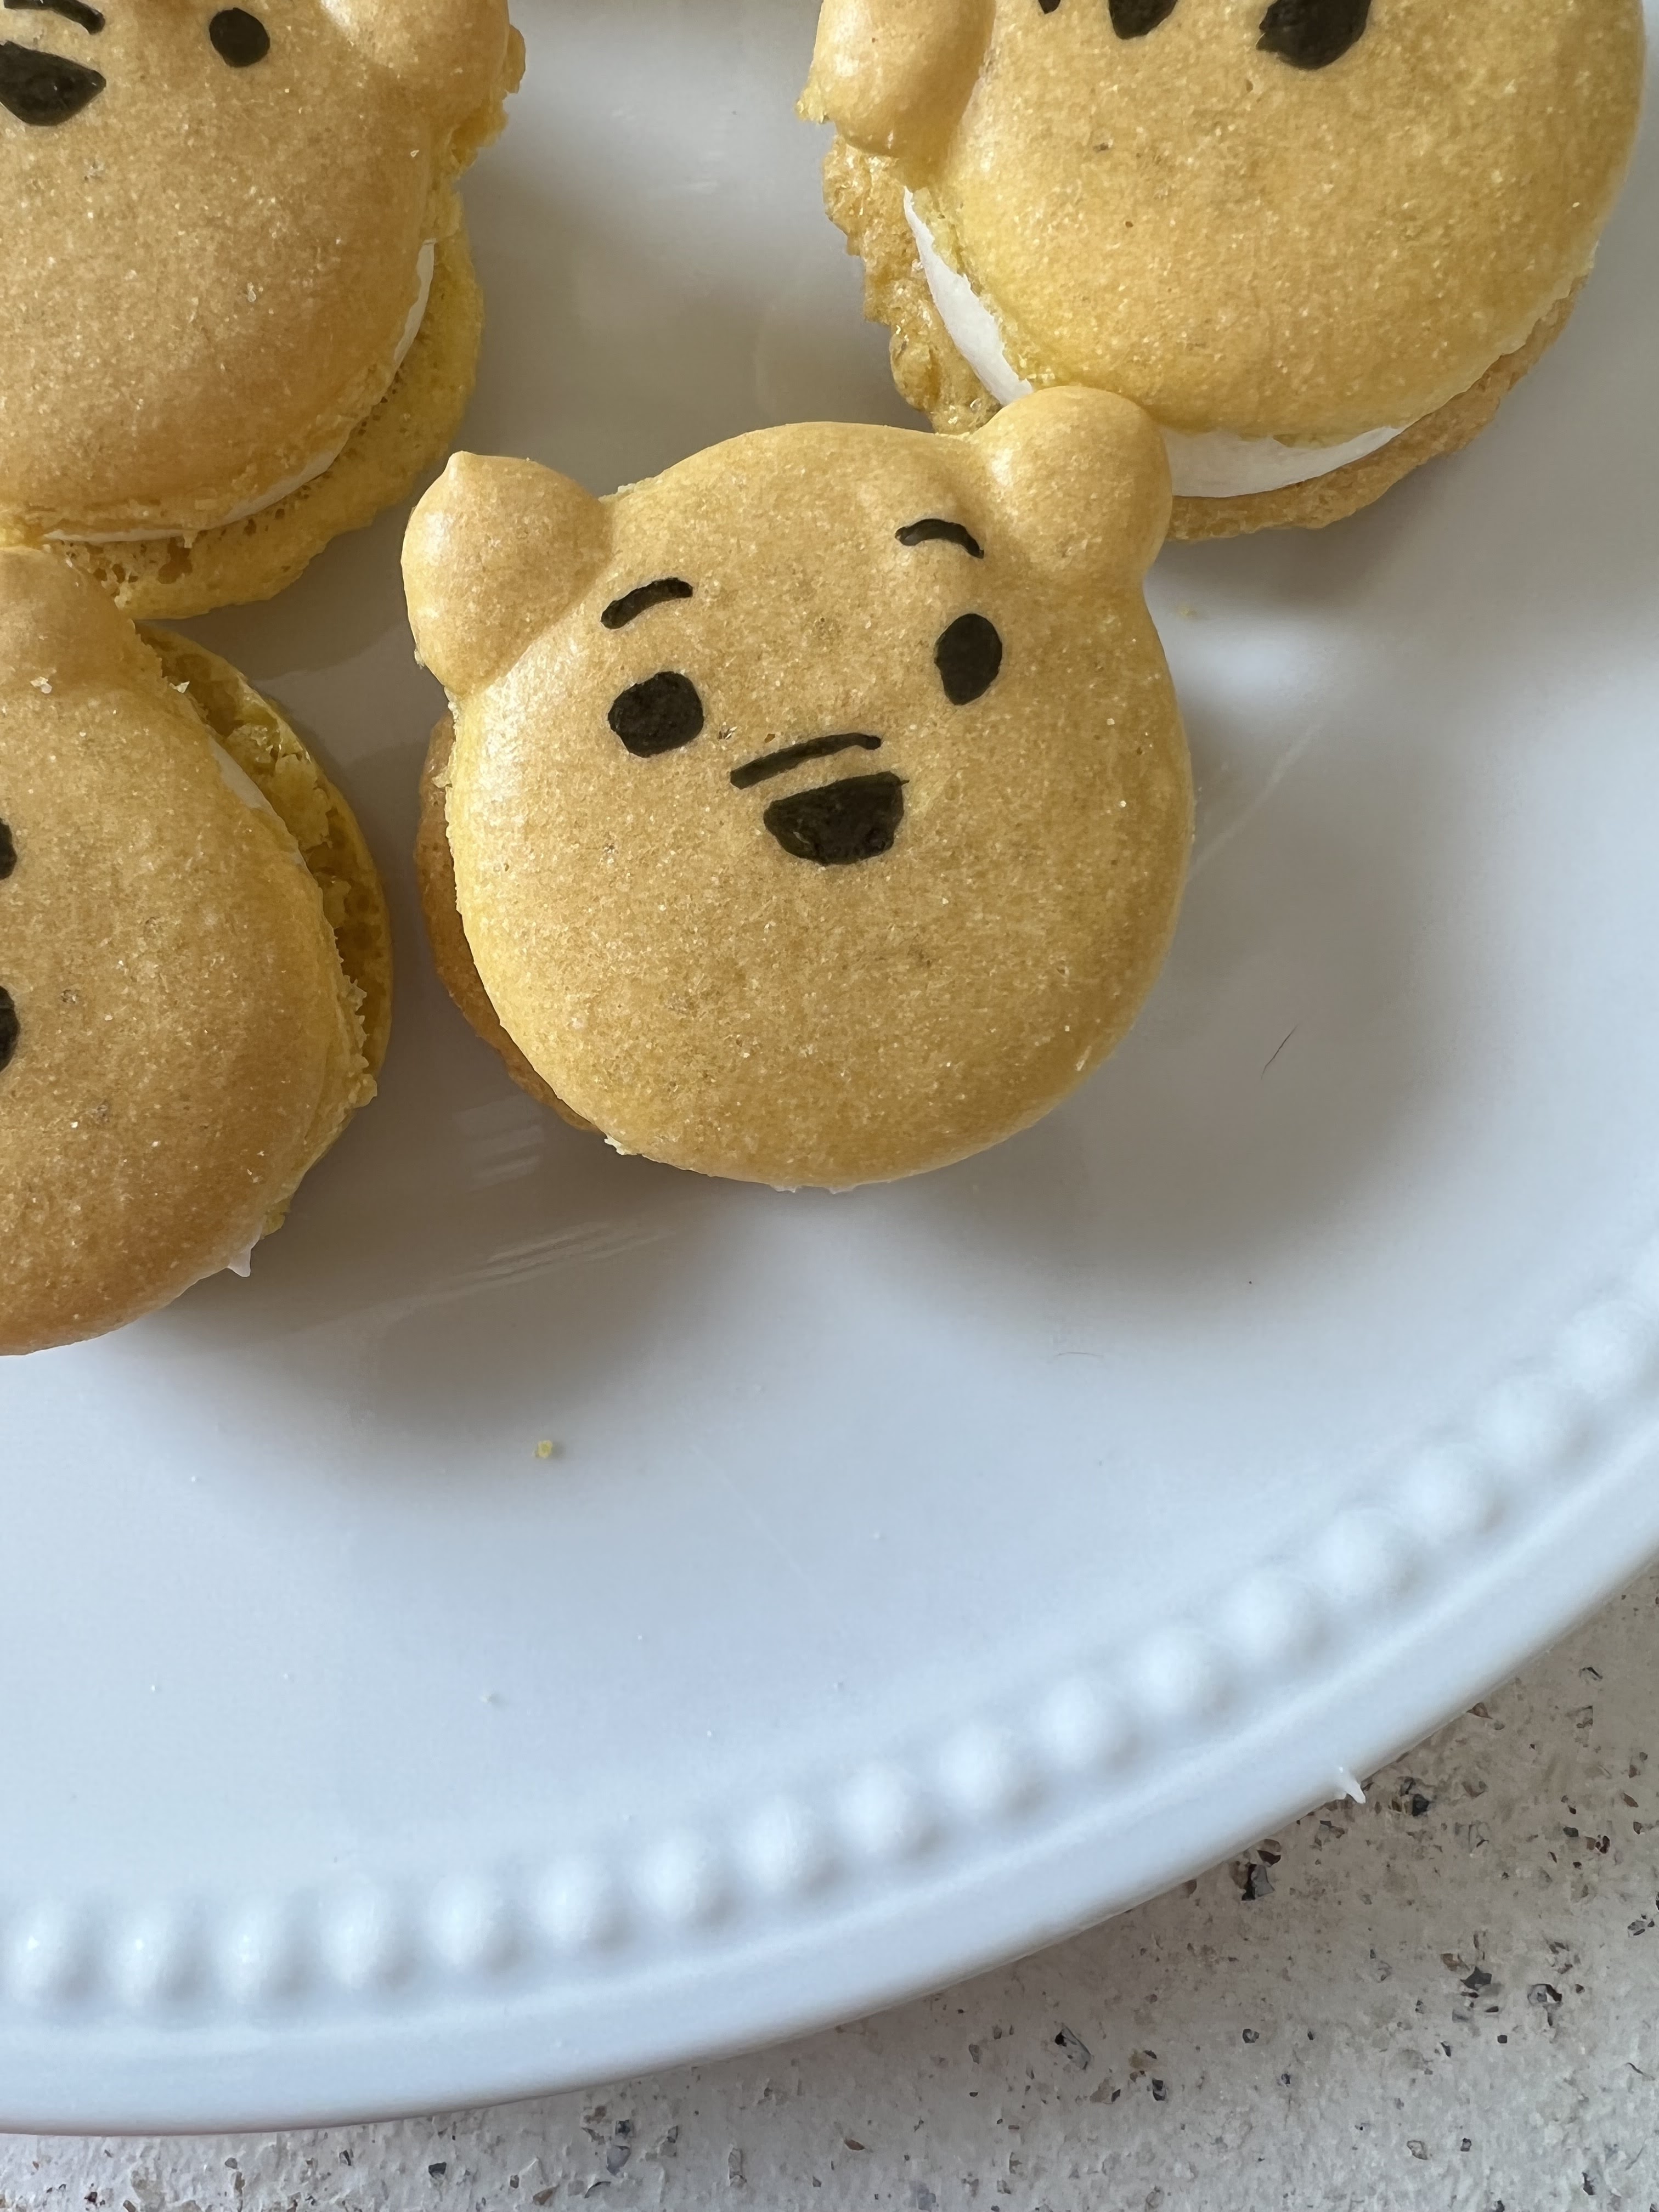
After tapping the counter 5 times with the tray you have to let them sit for 30-60 minutes until they are dry.  Then they go in the oven!!! Once they are completely cooled you can start drawing Pooh's face.  I used the Wilton Edible marker to draw Pooh's eyebrows, eyes, and nose. 


Almost done!! You just need to make a filling.  I made a honey cream cheese filling to stick with the Pooh theme, I know it's what Pooh would want! So I beat the butter and cream cheese then added the honey.  After it's creamed and blended well add in the powdered sugar.  

I used a piping bag to do the filling but that isn't always necessary, you can use a knife or spoon to spread the filling.  Then sandwich the shells and that's it! You have the cutest little Winnie the Pooh Macarons!


Ingredients:

Macarons:

1 3/4 cups powdered sugar
1 cup almond flour
1 tsp salt, divided
3 egg whites, at room temperature
1/4 cup granulated sugar
1/2 tsp vanilla extract
2 drops yellow gel food coloring
1 drop orange gel food coloring

Filling:

2 Tbsp unsalted butter, softened
1/4 cup cream cheese, softened
2 Tbsp honey
1 1/2 cup powdered sugar

Directions:

Making the macarons:

1. Put powdered sugar, almond flour, and 1/2 tsp of salt, and process on low speed.  Once the mixture is extra fine, sift into a large bowl.

2. In a separate large bowl (or stand mixer), beat the egg whites and the remaining 1/2 tsp of salt until soft peaks form.  Gradually add granulated sugar until fully incorporated.  Continue to beat until stiff peaks form.

3. Add vanilla and beat until incorporated.  Add the food coloring and beat until just combined.

4. Add 1/3 of the sifted almond flour mixture at a time to the beaten egg whites and use a spatula to gently fold until combined.  After the last addition of almond flour, continue to fold slowly until the batter falls into ribbons.

5. Transfer majority of the macaron batter to a piping bag with a large round tip.  Leave a little of the batter and place into a 2nd piping bag with a small round tip (for the ears).

6. To secure parchment paper to the baking sheet, place a dot of batter in each corner between the sheet and the paper.

7. Pipe the macarons onto the parchment paper.  Then add ears to half the shells (I didn't put ears on the back).

8.  Tap the baking sheet on a flat surface 5 times to release air bubbles.

9. Let the macarons sit at room temperature for 30-60 minutes, until dry to the touch.

10. Preheat oven to 300ยบ F

11. Bake for 17 minutes, until the feet are well-risen and the macarons don't stick to the parchment paper.

12. Transfer the macarons to a wire rack to cool completely before drawing the face and filling.

13.  When cool, use a black edible marker to add Pooh's eyes, nose, and eyebrows.

Honey Cream Cheese Filling

1. Make the filling: Add butter and cream cheese to a mixer and cream with a mixer for about 2 minutes until fluffy.

2. Add honey and mix to combine

3. Add the powdered sugar and mix on low speed until incorporated.  Then mix on medium until creamy.

4. Put filling in a piping bag and pipe onto one shell and then place another shell on top.

Wednesday, August 10, 2022

Empire Biscuits from Brave!

 Empire Biscuits from Brave!

Written by: Christine | August 10, 2022


Sometimes its a "someone slipped you free cookies" type of day and sometimes its a "someone tied your shoes under the table" type of day. We hope yours is the former!  These cookies are from one of our favorite scenes from Brave. We are on a Disney movie and food pairing kick and these little treats were so fun to make and share with our family. We hope you give them a try.

*the cookie base is so simple and we could see it being customized for all sorts of treats in the future!

Ingredients

1 C. of butter

1/3 C. Sugar

1 egg

½ tsp. vanilla (almond extract would be so good here too!)

3 C. flour

1 ½ C. confectioners’ sugar

1-2 TBSP. milk

15 Maraschino cherries (cut in half)

¾ C. raspberry jam

Cream butter and sugar until light and fluffy. Mix in egg until combined. Add in extract. Slowly add in flour until a crumbly dough forms. Wrap dough in plastic wrap and cool for about an hour.

Preheat oven to 400 degree, Turn onto a floured surface and roll out quite thinly 1/8 inch- 1/4 inch. Cut rounds, scalloped rounds, mickeys (whatever use your favorite cuter and about 2 ½-3 inch in diameter). *Flour your cutter, your roller and your offset spatula. Use offset spatula to lift cookies from surface to your parchment lined baking sheet.

Bake for approx. 12 minutes. They will very slightly turn golden, not brown. Cool completely.

Use a fork to slowly add milk to the powdered sugar. Add a little at a time until you reach a spreadable icing consistency. If you add too much, add more sugar to help. You may need more or less; you’ll know when you hit the right consistency.

Use a spoon to add a smear of jam. Top each jammed cookie with another cookie and use butter knife or offset spatula to spread the icing (not too much!). Top each with half a cherry. 


It’s easy to see why Hamish, Hubert and Harris love these so much!  But also, easy to understand their behavior too…these are a sugar kick for sure! Enjoy with milk or tea while watching Brave!


Remy's Ratatouille

Remy's Ratatouille

Written by: Christine | August 10, 2022


Want a fun way to help your kids want to eat their veggies? We watched Ratatouille with our 3 year old and told him we were going to recreate Remy's star dish! It was easy and delicious! He ate zucchini and eggplant happily!

We used a mandolin for thin consistent slices but that is not safe for little hands.

Ingredients

1 C. Tomato Sauce (homemade or your favorite store bought)

1 TBSP minced garlic (approx. 3 cloves)

1 Eggplant

1 Zucchini

1 Red Bell Pepper

1 Yellow or orange bell pepper

1 large tomato

1 Large potato

1 Sweet potato

3/4 C. Bechamel Sauce

*special equipment-mandolin and parchment paper

Preheat oven at 375 degrees. Make bechamel sauce (directions below). Clean all veggies. Peel the potatoes and slice with mandolin. Bring pot of water to a boil. Season with salt. Boil white potato for 2-3 minutes. Remove with slotted spoon. Boil sweet slices for 2 minutes and remove with slotted spoon. While the potatoes cool mandolin the zucchini and eggplant. Using a knife and cutting board slice tomato and peppers into thin slices.

Spoon about ¾ of the tomato sauce into a baking dish. Spoon and swirl ½ cup of the bechamel in. Sprinkle garlic over the mixture. Season with salt and pepper. If you like, now you can sprinkle your favorite herbs (oregano, thyme, basil etc. thinly chopped).

Make stacks of veggies then turn and fan out into the dish creating a swirling pattern until all the space is filled. If it is difficult to include the peppers in stacks, leave them out and squeeze in after you have your swirls fanned out.

Drizzle the remaining tomato sauce and bechamel sauce on top. You can sprinkle additional salt and pepper and even parmesan on top.

Cut a piece of parchment paper the same size as the top of your dish. Cover the dish with the parchment.

Bake for about 45-50 minutes until the sauce is bubbling and the veggies are tender. You want to let this cool for several minutes, so it holds together when you serve it. Don’t forget to spoon some sauce over your serving when you plate your dish!


For the bechamel:

1 TBSP. butter

1 TBSP. flour

1 C.  warm milk

2 TBSP. grated parmesan cheese

Salt and pepper

Dash of nutmeg


Heat butter in a saucepan. Add 1 tbsp flour and cook 1-2 minutes until it is combined and smells slightly nutty. You do not want to burn the butter; it should not start to darken much. If it does, start over.  Add warm milk slowly and stir well. Cook until sauce thickens and coat back of a spoon. Add parmesan and stir until it melts into the sauce. Season with salt, nutmeg, and black pepper. 


You can make this even simpler by substituting store bought marina and alfredo sauce if you like! We challenged our littles to make the tallest veggie stacks then fanned them out in the dish.  We talked about scents, flavors, colors and counted the layers in our stacks. We even made patterns with the veggies! Fun, tasty and educational!


Sunday, August 7, 2022

Pumpkin Mickey Beignets

Pumpkin Mickey Beignets

Written by: Christine | August 7, 2022


Seeing the Beignet Sundae  all over Insta has us craving Mickey Beignets!!! It seems like August is the new September with all the fall treats and merch coming out already and we are not complaining! We decided to try out a treat that has been available in Falls past at Disney's Sassagoula Floatworks and Food Factory at Port Orleans French Quarter, the Pumpkin Mickey Beignet! 

They came out beyond delicious and the scent of the freshly fried spiced dough made it feel like fall in our house. Give it a try and let us know what you think!

Ingredients:

·         1 ¼ tsp. active dry yeast (1/2 a packet)

·         ¼ C. brown sugar

·         ¾ C. Water (about 105 degrees)

·         1 egg slightly beaten (room temperature)

·         ½ tsp. salt

·         ½ C. buttermilk

·         2 TBSP. butter (melted)

·         ½ C. pumpkin puree (not pumpkin pie mix!)

·         1 tsp. vanilla

·         3-3  1/2 cups flour (plus extra for rolling)

·         1 ½ tsp. ground cinnamon

·         ¼ tsp. ground nutmeg

·         1/8 tsp. ground cloves

·         1/8 tsp. ground allspice

For dusting:

3/4 C. powdered sugar

1 TBSP. Cinnamon

Directions:

Add warm water, brown sugar and yeast to the bowl of a stand mixer. Whisk or mix with a fork. Let stand for 5 minutes to bloom yeast. It should look foamy with bubbles on the surface. If it does not, the yeast is dead, and the dough won’t rise.

After the yeast blooms. Turn the mixer on low. Add the next ingredients in the order on the list. (Except the dusting ingredients). For the flours start with 2 ½ C and add a couple TBSP. at a time until the dough comes together and starts to pull from the sides of the bowl. It will be sticky and wet but start to form. Add only as much flour as you need to get to that point.

Turn dough out into a buttered bowl. Cover with plastic wrap and set in a warm place. Allow to rest and raise until doubled in size (depending on the warmth and weather this could be 1-2 hours).

When you see the dough has risen enough, pour canola oil into a dutch oven or cast-iron pan. Make sure not to fill too high (leaving at least an inch of space to protect from overflowing and splatter). Attach a cooking/candy thermometer to monitor temperature). Allow oil to come to 350-380 as you roll dough. Keep a close eye on this and adjust your flame to not overheat.

After the dough has risen, pour it out onto a well floured surface. Using a floured rolling pin, roll out 1/4 -1/3 inch thick. Use a floured Mickey cookie cutter to cut out your beignets. The dough is sticky! Make sure to refloor your surface, cutter and roller and place cut beignets on a floured plate or surface.


Lower your cut dough into the hot oil using a frying spider. Fry 1-1.5 minutes per side. Fry until deeply golden and remove the finished beignets using a spider onto a paper towel lined rack. Do not over crowd your pot.

Mix the powdered sugar and cinnamon. Sift the mixture onto the warm beignets. (We made a caramel sauce, but any store bought will do just as well).


Pro tip: Serve these with APPLE BUTTER!


Unpopular opinion, you can wrap these in an airtight container and toast them in the oven the next day, they are great with butter, jam, syrup, coffee…anything they are just good!


Irish Soda Bread Mickeys

  Mickey Irish Soda Bread Written by: Christine | March 2, 2023 Ingredients: 4 1/2-4 3/4 C. AP flour (plus more for rolling out) 1 tsp. baki...